[BoostCamp AI Tech / Pre-Course 2] Pytorch 기본
네이버 부스트코스의 Pre-course 강의를 기반으로 작성한 포스트입니다.
Pytorch 소개
딥러닝 프레임워크는 크게 2가지가 있다. 하나는 Pytorch로 페이스북에세 개발하였다. 나머지 하나는 TensorFlow로 이 프레임워크는 구글에서 개발하였다.
파이토치와 텐서플로우의 가장 큰 차이점은 backward를 실행할 때 그래프로 표현하는 방식이다.
- Pytorch는 실행하면서 그래프를 생성하는 방식(Define by Run, Dynamic Computation Graph)
- TensorFlow는 그래프를 먼저 정의하고 실행시점에 데이터를 feed(Define and run)하는 방식
Pytorch의 장점은 Debugging 할 때이다.
파이토치는 즉시 값을 확인하는 것이 가능하며 파이썬과 굉장히 유사한 코드 방식을 가지고있다. 또한, GPU가 지원되며, API와 커뮤니티가 잘 형성되어있으며 사용하기 편하다.
피아토치의 가장 핵심적인 부분은
- Numpy
- AutoGrad
- Function
라고 말할 수 있다. 추가적으로는 Dataset, Multi-GPU가 있다.
Pytorch 기초
Tensor
다차원 Arrays를 표현하는 Pytorch 클래스로 사실상 numpy의 ndarray와 동일하다.(TensorFlow의 Tensor와도 동일)
또한, Tensor를 생성하는 함수도 거의 동일
1
2
3
4
5
6
7
8
9
10
11
12
13
# numpy - ndarray
import numpy as np
n_array = np.arange(10).reshape(2, 5)
print(n_array)
print("ndim: ", n_array.ndim, "shape: ", n_array.shape)
# ndim: 2 shape: (2, 5)

# pytorch - tensor
import torch
t_array = torch.FloatTensor(n_array)
print(t_array)
print("ndim: ", t_array.ndim, "shape: ", t_array.shape)
# ndim: 2 shape: torch.Size([2, 5])
Tensor는 list나 ndarray를 사용하여 생성할 수 있다.
1
2
3
4
5
6
7
# data to tensor
data = [[3, 5], [10, 5]]
x_data = torch.tensor(data)

# ndarray to tensor
nd_array_ex = np.array(data)
tensor_array = torch.from_numpy(nd_array_ex)
Tensor가 가질 수 있는 data 타입은 numpy와 동일하다.
1
2
3
4
5
6
7
8
9
10
11
12
data = [[3, 5, 20], [10, 5, 50], [1, 5, 10]]
x_data = torch.tensor(data)

x_data[1:]  # tensor([[10, 5, 50], [1, 5, 10]])
x_data[:2, 1:]  # tensor([[5, 20], [5, 50]])
x_data.flatten()    # tensor([3, 5, 20, 10, 5, 50, 1, 5, 10])

torch.ones_like(x_data)    # tensor([[1, 1, 1], [1, 1, 1], [1, 1, 1]])

x_data.numpy()  # array([[3, 5, 20], [10, 5, 50], [1, 5, 10]], dtype=int64)
x_data.shape    # torch.size([3, 3])
x_data.dtype    # torch.int64
pytorch의 tensor는 GPU에 올려서 사용이 가능하다.
1
2
3
4
5
x_data.device   # device(type='cpu')

if torch.cuda.is_available():
    x_data_cuda = x_data.to('cuda')
    x_data_cuda.device  # device(type='cuda', index=0)
Tensor handling
view, squeeze, unsqueeze 등으로 tensor를 조정할 수 있다.
view: reshape과 동일하게 tensor의 shape을 변환
view를 쓰는 것을 권장한다.
1
2
3
4
5
6
7
8
9
10
11
12
13
14
15
16
17
18
19
20
21
22
23
tensor_ex = torch.rand(size=(2, 3, 2))
tensor_ex
"""
tensor([[[0.7466, 0.5440],
        [0.7145, 0.2119],
        [0.8279, 0.0697]],

        [[0.8323, 0.2671],
        [0.2484, 0.8983],
        [0.3228, 0.2254]]])
"""

tensor_ex.view([-1, 6])
"""
tensor([[0.7466, 0.5440, 0.7145, 0.2119, 0.8279, 0.0697],
        [0.8323, 0.2671, 0.2484, 0.8983, 0.3228, 0.2254]])
"""

tensor_ex.reshape([-1, 6])
"""
tensor([[0.7466, 0.5440, 0.7145, 0.2119, 0.8279, 0.0697],
        [0.8323, 0.2671, 0.2484, 0.8983, 0.3228, 0.2254]])
"""
view는 contiguous tensor이지만 reshape은 non-contiguous tensor이다.
non-contiguous tensor은 data를 coy한다.
contiguous: Torch의 Array의 값이 연속적인 메모리 위치를 가지는 상태
1
2
3
4
5
6
7
8
9
10
11
12
13
14
15
16
17
18
19
20
21
22
23
24
25
26
27
28
a = torch.zeros(3, 2)
b = a.view(2, 3)
a.fill_(1)
"""
tensor([[1., 1.],
        [1., 1.],
        [1., 1.]])
"""
b
"""
tensor([[1., 1., 1.],
        [1., 1., 1.]])
"""


a = torch.zeros(3, 2)
b = a.t().reshape(6)
a.fill_(1)
"""
tensor([[1., 1.],
        [1., 1.],
        [1., 1.]])
"""
b
"""
tensor([[0., 0., 0.],
        [0., 0., 0.]])
"""
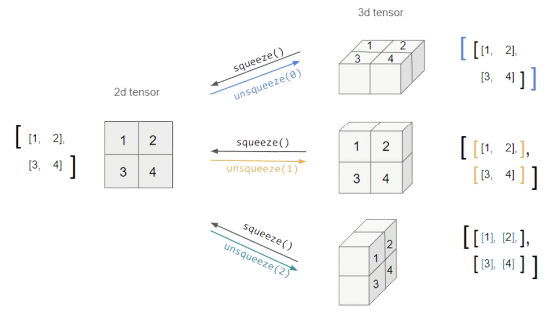
squeeze: 차원의 개수가 1인 차원을 삭제(압축)unsqueeze: 차원의 개수가 1인 차원을 추가
1
2
3
4
5
6
7
8
9
10
11
12
13
14
15
16
tensor_ex = torch.rand(size=(2, 1, 2))
tensor_ex.squeeze()
"""
tensor([[0.8510, 0.8263],
        [0.7602, 0.1309]])
"""

tensor_ex = torch.rand(size=(2, 2))
tensor_ex.unsqueeze(0).shape
# torch.Size([1, 2, 2])

tensor_ex.unsqueeze(1).shape
# torch.Size([2, 1, 2])

tensor_ex.unsqueeze(2).shape
# torch.Size([2, 2, 1])
Tensor operations
기본적인 tensor의 operations는 numpy와 동일하다.
1
2
3
4
5
6
7
8
9
10
11
12
13
14
15
16
17
18
19
20
21
22
23
24
n1 = np.arange(10).reshape(2, 5)
t1 = torch.FloatTensor(n1)
"""
tensor([[0., 1., 2., 3., 4.],
        [5., 6., 7., 8., 9.]])
"""

t1 + t1
"""
tensor([[0., 2., 4., 6., 8.],
        [10., 12., 14., 16., 18.]])
"""

t1 - t1
"""
tensor([[0., 0., 0., 0., 0.],
        [0., 0., 0., 0., 0.]])
"""

t1 + 10
"""
tensor([[10., 11., 12., 13., 14.],
        [15., 16., 17., 18., 19.]])
"""
행렬곱셈 연산 함수는 dot가 아닌 mm을 사용한다.
- 스칼라 또는 벡터 간 내적은 dot을 사용하고 행렬 간의 곱셈은 mm을 사용한다.
1
2
3
4
5
6
7
8
9
10
11
12
13
14
15
16
17
n2 = np.arange(10).reshape(5, 2)
t2 = torch.FloatTensor(n2)

t1.mm(t2)
"""
tensor([[60., 70.],
        [160., 195.]])
"""

t1.dot(t2)
# RuntimeError

t1.matmul(t2)
"""
tensor([[60., 70.],
        [160., 195.]])
"""
mm과matmul의 차이점:mm은 broadcasting을 지원하지 않지만matmul은 brodacasting을 지원한다.
1
2
3
4
5
6
7
8
9
10
11
12
13
14
15
16
# mm 사용
a = torch.rand(5, 2, 3)
b = torch.rand(5)
a.mm(b) # Runtime Error

# matmul 사용
a = torch.rand(5, 2, 3) # 주로 (batch, , ) 이런 형식
b = torch.rand(3)
a.matmul(b)
"""
tensor([[0.8846, 0.9696],
        [0.8540, 0.8274],
        [0.9706, 0.2823],
        [0.6618, 0.9058],
        [0.8551, 0.4887]])
"""
Pytorch의 nn.functional 모듈을 통해 다양한 수식 변환을 지원한다.
1
2
3
4
5
6
7
8
9
10
11
12
13
14
15
16
17
18
19
20
21
22
23
24
25
import torch
import torch.nn.functional as F

tensor = torch.FloatTensor([0.5, 0.7, 0.1])
h_tensor = F.softmax(tensor, dim=0)
h_tensor
# tensor([0.3458, 0.4224, 0.2318])

y = torch.randint(5, (10, 5))
y_label = y.argmax(dim=1)
y_label # tensor([3, 1, 2, 2, 2, 2, 0, 1, 3, 0])

torch.nn.functional.one_hot(y_label)
"""
tensor([[1, 0, 0, 0, 0],
        [1, 0, 0, 0, 0],
        [1, 0, 0, 0, 0],
        [0, 0, 0, 1, 0],
        [0, 1, 0, 0, 0],
        [0, 0, 0, 0, 1],
        [1, 0, 0, 0, 0],
        [1, 0, 0, 0, 0],
        [1, 0, 0, 0, 0],
        [1, 0, 0, 0, 0]])
"""
1
2
3
4
5
6
7
8
9
10
11
12
13
14
15
16
17
import itertools
a = [1, 2, 3]
b = [4, 5]
list(itertools.product(a, b))
# [(1, 4), (1, 5), (2, 4), (2, 5), (3, 4), (3, 5)]

tensor_a = torch.tensor(a)
tensor_b = torch.tensor(b)
torch.cartesian_prod(tensor_a, tensor_b)   # 모든 경우의 수를 구해줌
"""
tensor([[1, 4],
        [1, 5],
        [2, 4],
        [2, 5],
        [3, 4],
        [3, 5]])
"""
AutoGrad
Pytorch의 핵심적인 기능은 자동 미분의 지원이다. backward 함수를 사용하여 구현한다.
1
2
3
4
5
6
7
8
9
10
a = torch.tensor([2., 3.], requires_grad=True)
b = torch.tensor([6., 4.], requires_grad=True)
Q = 3*a**3 - b**2
external_grad = torch.tensor([1., 1.])
Q.backward(gradient=external_grad)

a.grad
# tensor([36., 81.])
b.grad
# tensor([-12., -8.])
Pytorch 프로젝트 구조
초기 단계에서는 대화식 개발 과정이 유리하다.
- 학습 과정과 디버깅 등 지속적인 확인
배포 및 공유 단계에서는 notebook 공유의 어려음이 있다.
- 쉬운 재현의 어려움, 실행순서 꼬임
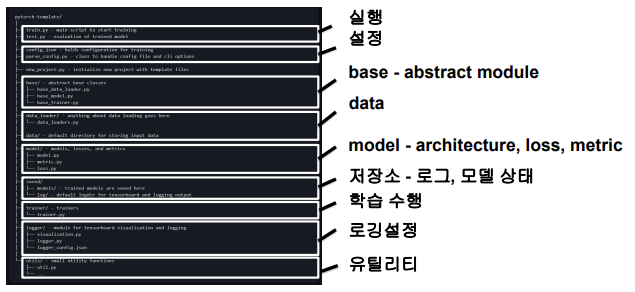
DL 코드도 하나의 프로그램으로 생각해 개발 용이성 확보와 유지보수 향상이 필요하다.
다양한 모듈들을 분리하여 프로젝트 템플릿화시키는 것이 좋다.
1
2
3
4
5
6
7
8
9
10
11
12
13
14
15
16
17
18
19
20
21
22
.
├── callbacks // here you can create your custom callbacks
├── checkpoint // were we store the trained models
├── data // here we define our dataset
│ └── transformation // custom transformation, e.g. resize and data augmentation
├── dataset // the data
│ ├── train
│ └── val
├── logger.py // were we define our logger
├── losses // custom losses
├── main.py
├── models // here we create our models
│ ├── MyCNN.py
│ ├── resnet.py
│ └── utils.py
├── playground.ipynb // a notebook that can be used to fast experiment with things
├── Project.py // a class that represents the project structure
├── README.md
├── requirements.txt
├── test // you should always perform some basic testing
│ └── test_myDataset.py
└── utils.py // utilities functions
이 글은 비밀번호로 보호되어 있습니다.